
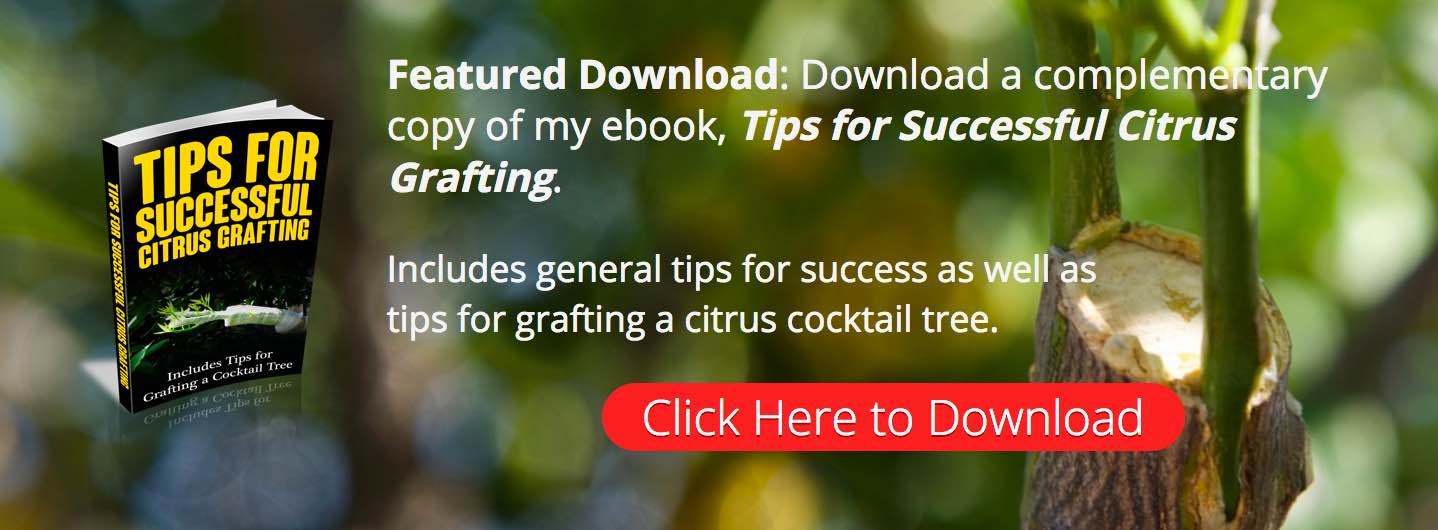
Grafting Citrus Trees – Cleft Grafting a Citrus Cocktail Tree
This step-by-step tutorial on grafting citrus trees shows how to graft citrus successfully using the cleft graft. The grafting of a multi-variety citrus cocktail tree is shown. A scion of a Sarawak Pummelo is grafted onto a mature Oroblanco tree.

The cleft graft is useful for grafting citrus trees of any kind including: oranges, mandarins, lemons, limes, grapefruit, pummelos, and kumquats. In addition to citrus trees, the cleft graft is also useful for grafting fruit trees of many other types. Although this tutorial shows the use of the cleft graft to add a new variety to a multi-grafted citrus cocktail tree, the cleft graft is also useful for grafting new citrus trees. Although this tutorial shows the use of the cleft graft to graft a new variety to a mature citrus tree to make a multi-grafted citrus cocktail tree, the cleft graft is also useful for grafting new citrus trees.
Grafting Citrus Trees with the Cleft Graft – YouTube Video
In addition to this step-by-step guide, I have also made a YouTube video (see below) showing the cleft grafting of citrus trees.
Citrus Budwood from a Disease-free Source
Citrus cuttings have the potential to spread tree-killing diseases. It is often not apparent when a tree is infected with a fatal disease. This makes the source of citrus budwood for grafting very important.
In California we now have both exotic diseases that kill citrus trees and also the insects that spread the diseases. The situation is so severe that it now against the law in California to graft with cuttings taken from backyard citrus trees. To save our trees from deadly diseases, hobbyists in California no longer swap citrus cuttings with friends. We now instead order our budwood at a nominal cost from the Citrus Clonal Protection Program (CCPP), a program that exists to provide disease-free budwood for the grafting of citrus trees.
The CCPP will ship budwood anywhere in the world where the local government allows it. Many citrus growing regions where CCPP budwood is not allowed have their own disease-free citrus budwood programs. Here I have created a web page that lists some other programs: Citrus Budwood Programs.
The below YouTube video goes through in detail the process of setting up an account and placing a budwood order with CCPP.
Disinfecting Grafting Tools
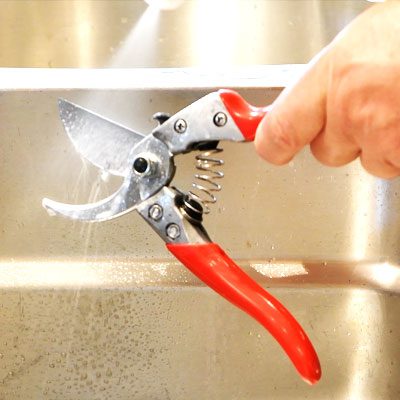
In order to both maximize the probability that the graft lives and also to prevent the spread of disease from tree to tree, it is important to disinfect grafting tools between grafts. To learn more about disinfecting grafting tools, please see the following link: Disinfecting Grafting Tools.
Choosing the Grafting Technique based upon the Scion Size
There is no single best grafting method for citrus, but when grafting multiple varieties to a mature citrus tree I often prefer to use a scion graft rather than a bud graft. I have found that chip bud grafts and T-bud grafts of additional citrus varieties tend to be very slow to grow or they do not grow at all. Scion grafts on the other hand are more likely to grow and they grow more quickly. For this particular graft, the scions that I received from the CCPP were slightly smaller in diameter than my target branch, so I decided to use the cleft graft and I selected the scion closest in size to my target branch. Had the scions been significantly smaller than my target branch, I would have chosen the bark graft instead. For cases where the diameter of the scion is bigger than the diameter of the rootstock, I like to use the Z graft.
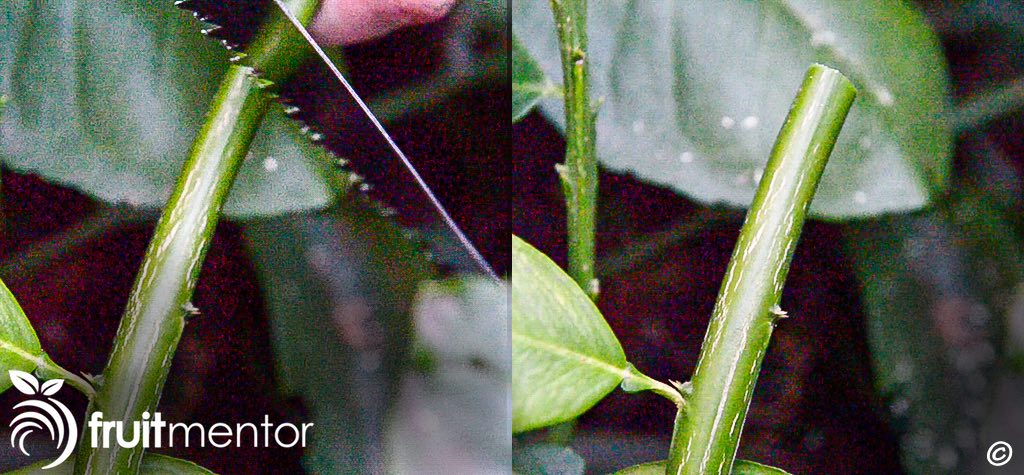
Cutting off the end of the Branch
The first step is to cut the end off of the target branch. I prefer to use a saw because the clean cut causes the least amount of damage to the target branch.
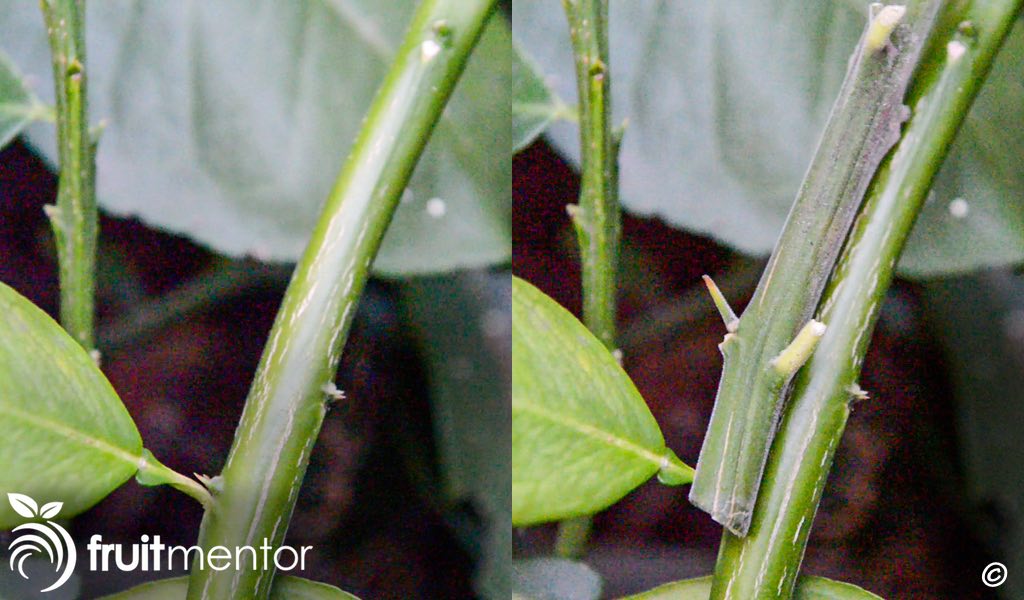
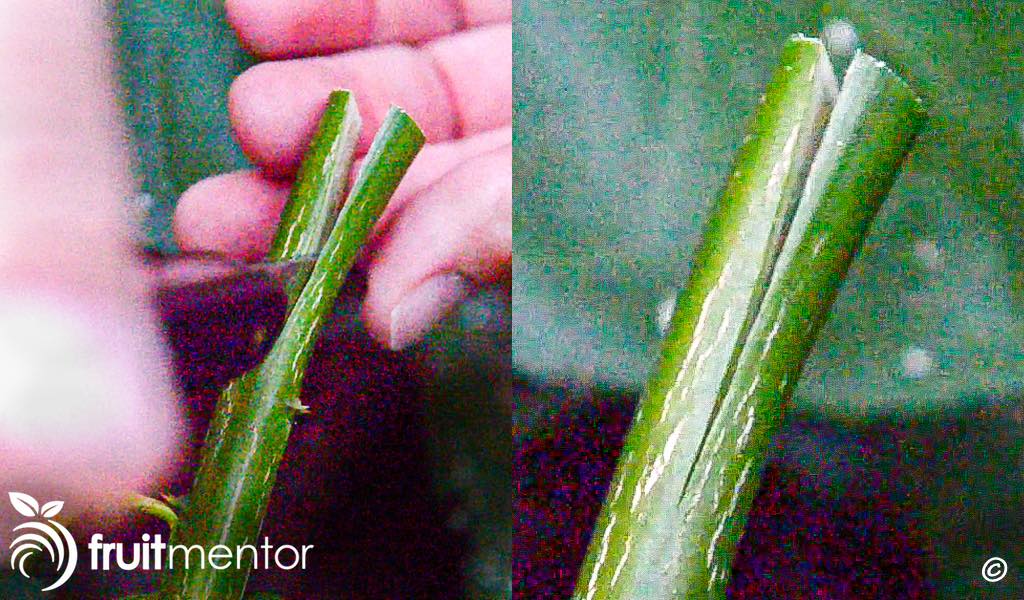
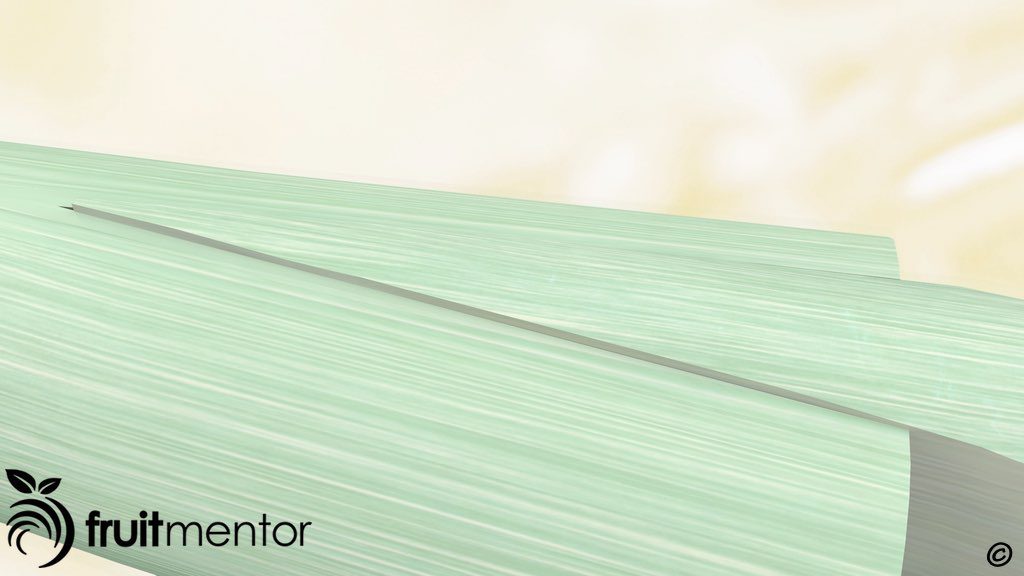
Splitting the Target Branch
The next step is to split the end of the target branch to create the cleft into which the scion will be inserted. I begin the cut at the middle of the end of the branch and slowly rock the knife back and forth until the cut is the desired length. This cut is about 1.5 inches (4 centimeters).
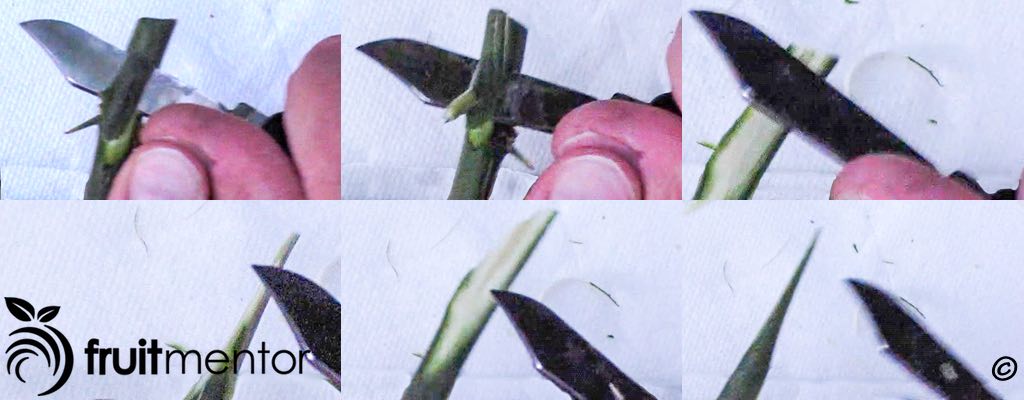
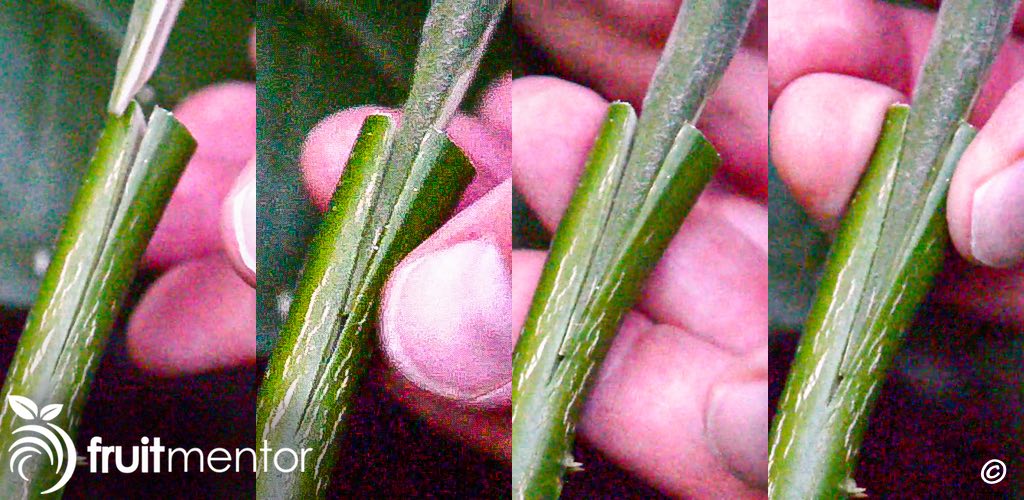
Examining the Scion
The next step is to examine the scion to determine where to cut it. In this graft I will focus on matching a single side of the scion to the cleft in the target branch. I choose the flattest side of the scion. I will cut the flattest side to a tapered point for easy insertion into the target branch.

Cutting the Scion
Here I cut the scion to a tapered point. I focus on a single side of the scion. The opposite side of the scion does not need to line up with the target branch. For easy insertion, the opposite side of the scion can be cut thinner than the side that will be lined up.
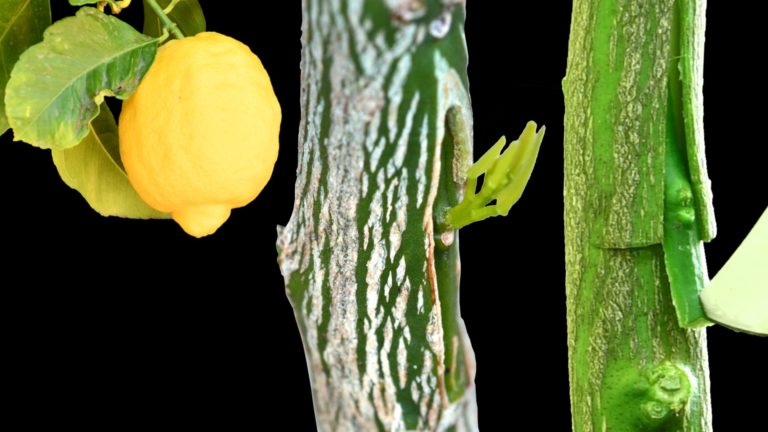
Secret to Success: Aligning the Cambium Layers
The goal with any type of citrus grafting is to connect the cambium layer of the scion to that of the rootstock or target branch. The cambium is a very thin layer of tissue between the bark and the wood. The distance of the cambium layer to the outside of the bark tends to vary depending upon the diameter of the wood. I have seen many grafting tutorials that give the impression that the grafter must make an exact match between the cambium layers all along the length of the graft. Such a match would be quite difficult since the bark obscures the cambium layer and since the cambium layer is so thin.
Outside of Bark Aligned
The below illustration shows an example where the scion and target branch are aligned at the outside of the bark.
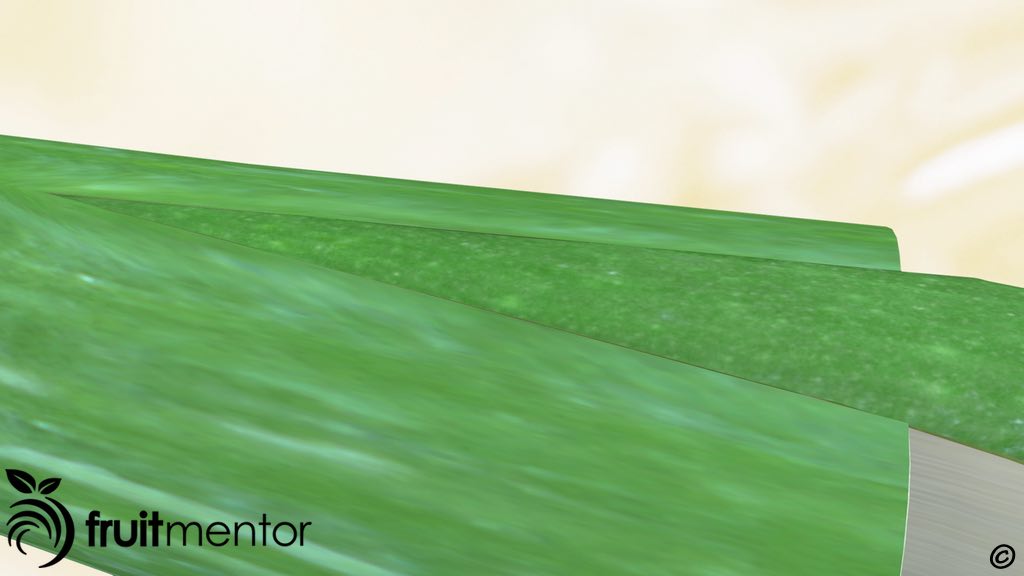
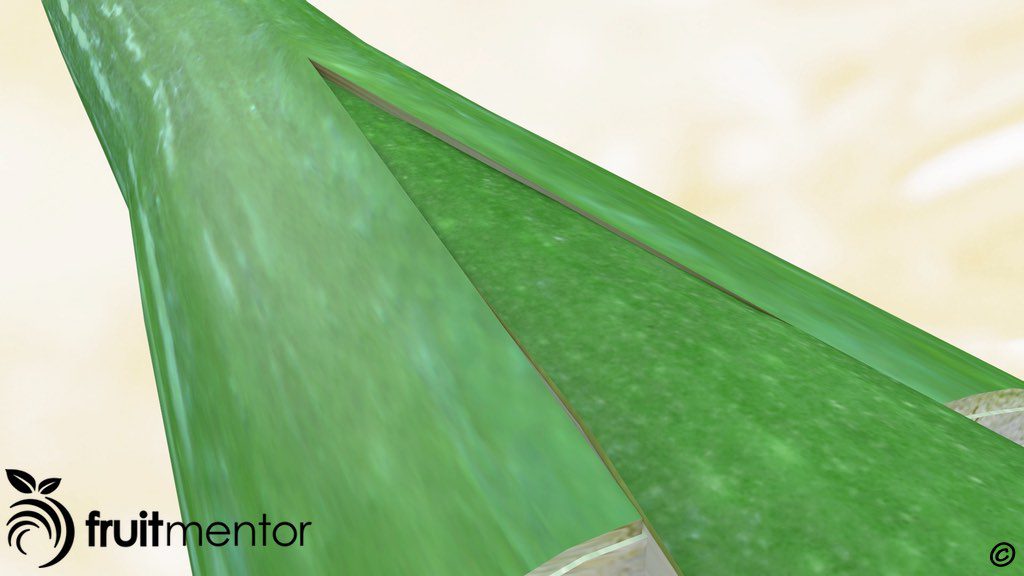
Cambium Layers Not Aligned
The below illustration shows the same graft as above, but with the bark removed and the cambium layers revealed. Although the bark was aligned, there is no contact between the cambium of the scion and the cambium of the target branch; this graft would fail.
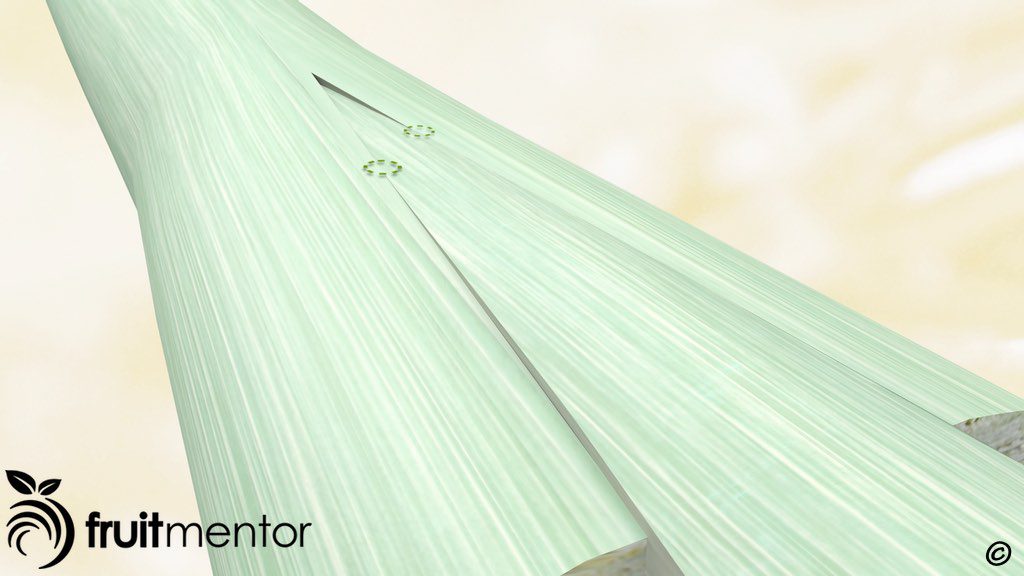
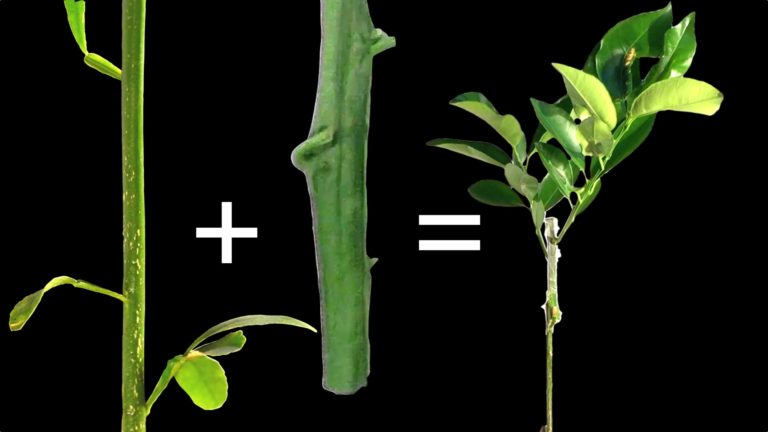
Aligning the Cambium Layers at Two Points
In the below illustration, the angle of the scion has been slightly adjusted in an attempt to create contact between the cambium of the scion and that of the target branch.
Cambium Layers Now in Contact
The below illustration shows the same scion angle as above, but with the bark removed and the cambium layers revealed. The cambium layer of the scion is now in contact with the cambium layer of the target branch in two places. The cambium does not need to be lined up all along. These two points of contact are sufficient for a successful graft. When the graft heals, callus tissue will grow and connect more of the cambium layers.
Inserting the Scion
Here I insert the scion at a slight angle to ensure that the cambium layers are in contact. The angle is opposite of the above illustration. The above illustration showed the top of the scion angled outward, but in my example below the top of the scion is angled inward. Either way will work.
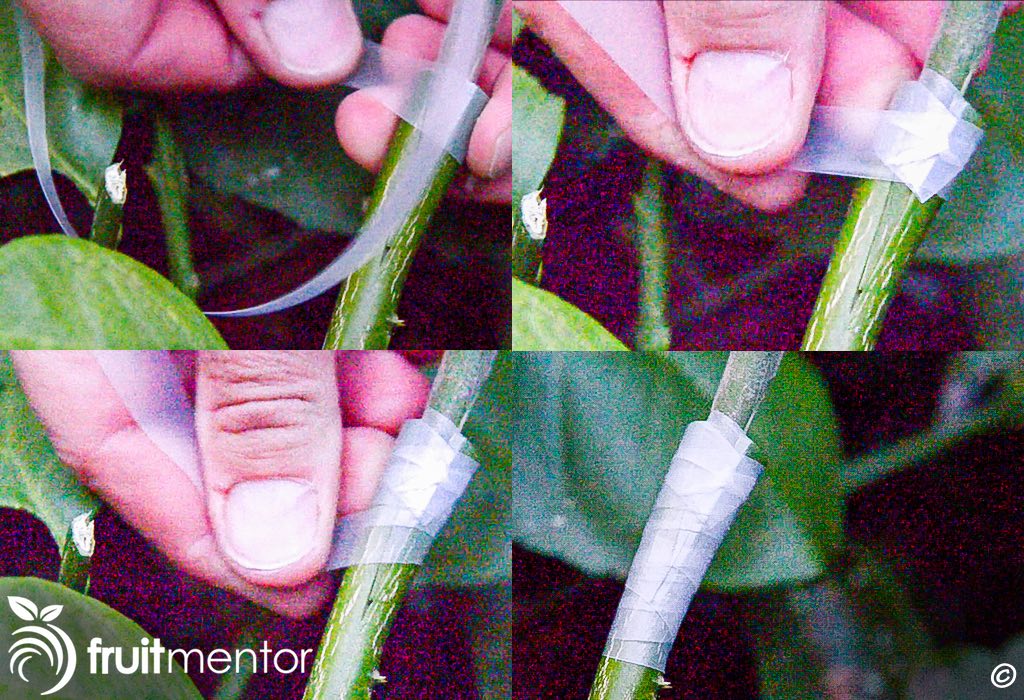
Wrapping the Graft with Parafilm
Here I wrap the graft with an initial layer of parafilm to seal the graft and hold it in place. To get a good seal, I gently pull on the parafilm as I wrap it. This makes it stick to itself. I used half inch parafilm to wrap the scion. The following link shows where parafilm can be ordered: Grafting Supplies.
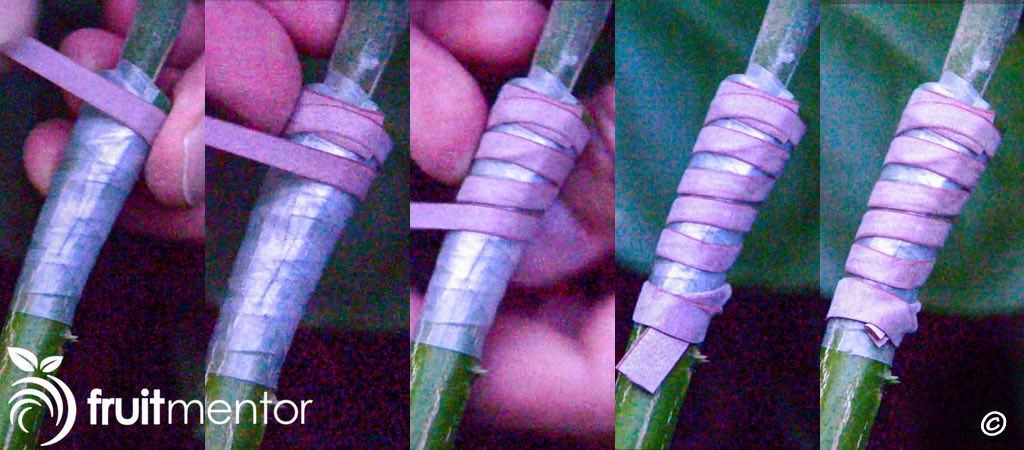
Wrapping with a Rubber Band
In order to ensure close contact between the cambium layers and to strengthen the graft while it is healing, I wrap it with a rubber band.
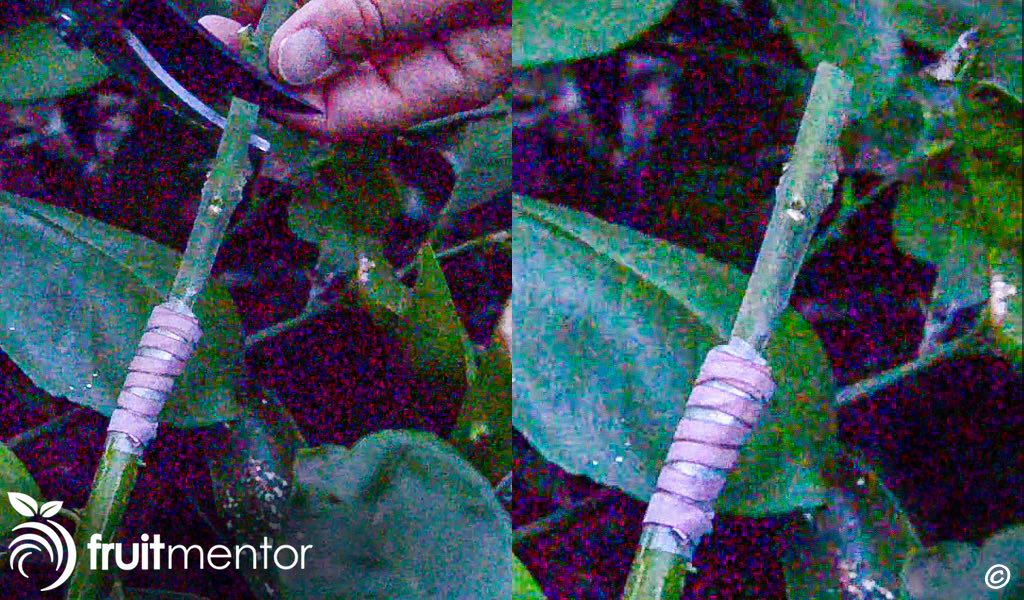
Pruning the Scion to Three or Four Buds
Here I prune the scion to leave three or four buds. In this particular example the scion has three buds remaining.
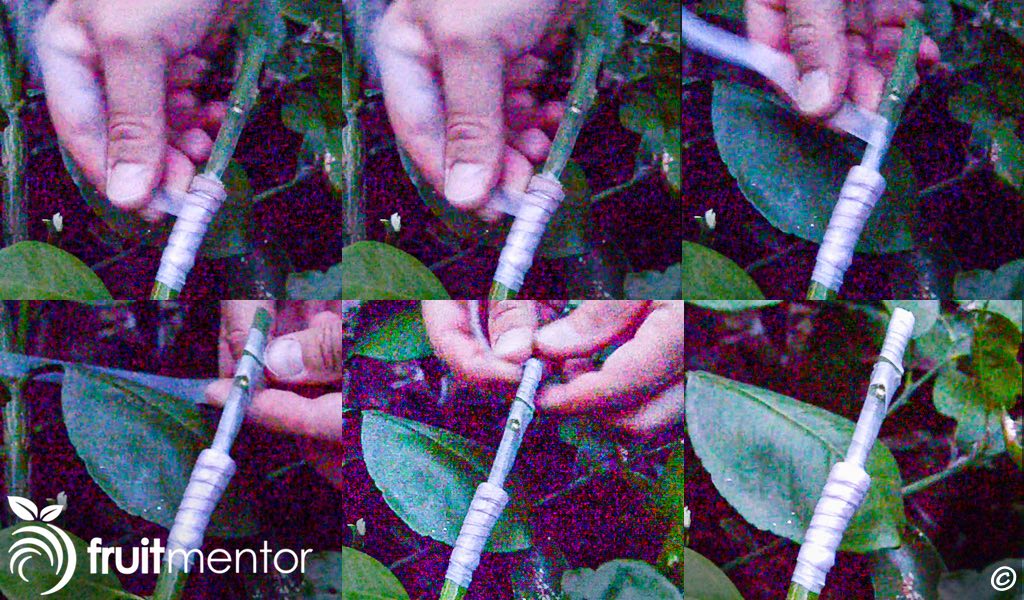
Adding a Second Layer of Parafilm
The next step is to wrap the scion with a second layer of parafilm. I wrap starting from the bottom, overlapping as I go up and gently pulling on the parafilm to make it stick. Overlapping the layers keeps the graft from drying out and will also keep out rainwater. Keeping out rainwater will help the graft survive in climates that are rainy during grafting season. Other than the buds I completely wrap the scion, including the cut end. Some people cover the buds with parafilm, but when I tried that, I noticed that buds of some citrus varieties struggle to break through the parafilm.
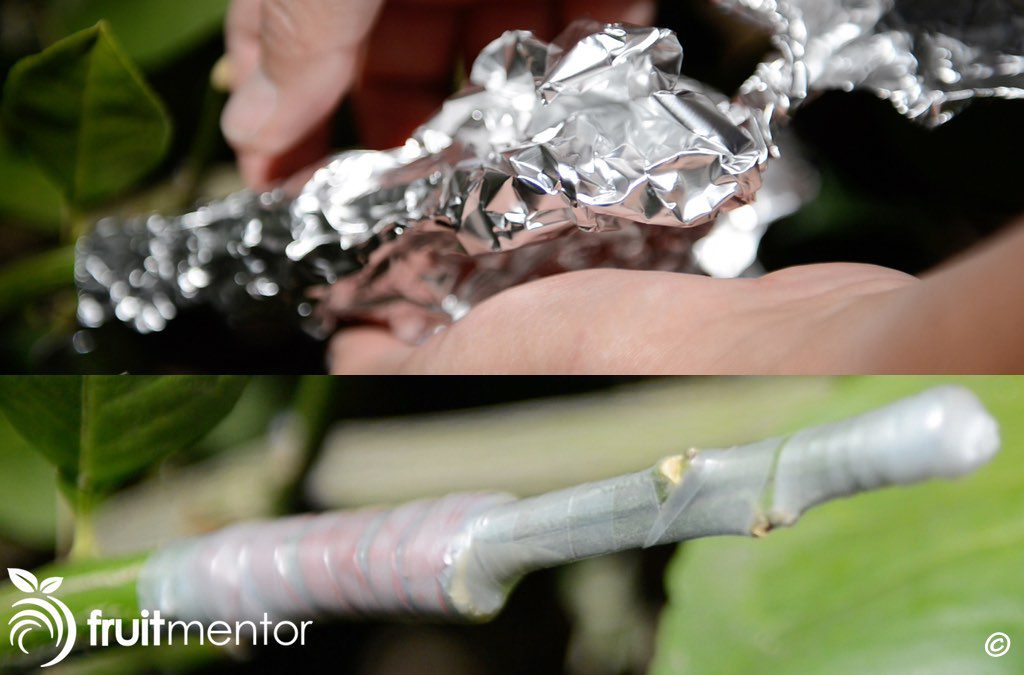
Protecting the Graft from the Sun
At the time of year that I performed this graft, the temperatures were getting into the upper part of the optimum range (70°F to 85°F ; 21°C to 29°C) for healing of citrus grafts. In order to keep the graft from absorbing sunlight and getting even hotter, I gently wrapped it with aluminum foil to reflect the sunlight.

Removing the Aluminum Foil after Three Weeks
Citrus grafts typically heal within three weeks, so I removed the foil after three weeks. The scion was still green which is a good sign. Many failed grafts would be brown after three weeks.
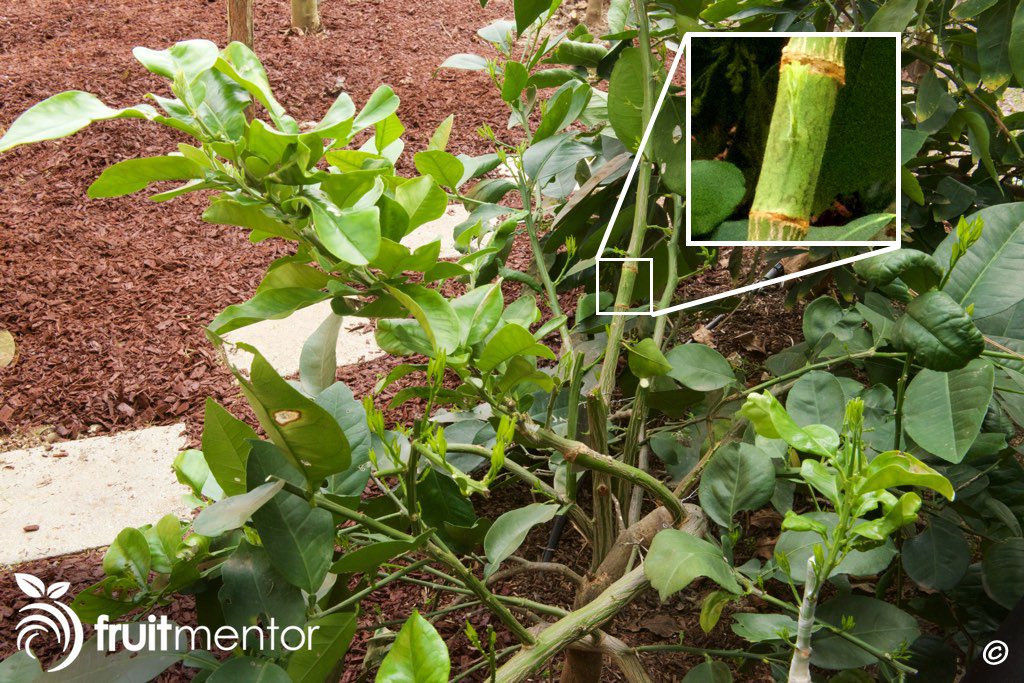
Citrus Cleft Graft Growing
After removing the aluminum foil, the next step is to be patient and wait for the graft to start growing. Sometimes the buds on the scion will start growing within a couple of weeks. Other times I have seen it take months. Patience is the key. The below photos show about four months of growth.

Healing of the Citrus Cleft Graft
The below photos show the graft union after many months of growth. The rubber band and parafilm had deteriorated and were no longer needed, so I removed them. The graft had healed well on the front and on the back.

Citrus Cocktail Tree with Four Varieties
The below photo shows the tree with the Sarawak branch extending from the lower middle of the photo to the upper left of the photo. It also shows two other pummelo varieties that have been grafted to the Oroblanco tree.
Save Citrus Trees by Spreading the Word
In places where huanglongbing has spread, citrus trees now have very short life spans. Parts of the world that do not have the disease are highly vulnerable. There is no cure for the disease, but education can slow the spread. Please help stop the spread to new parts of the world by sharing this article and the importance of grafting with registered disease-free budwood. Thank you!
Resources for Californians
Please visit CaliforniaCitrusThreat.org for more information on how to stop the spread of huanglongbing.
California Law Regarding Citrus Propagation
In California, the collection of any citrus propagative materials, including budwood and seeds, from non-registered sources is illegal. Any citrus trees grown or grafted in California must come from source trees registered with either:
- The Citrus Nursery Stock Pest Cleanliness Program, administered by the California Department of Food and Agriculture, or
- The Citrus Clonal Protection Program, located at the University of California at Riverside.
Funding
This article was funded by a grant from California's Citrus Research Board.


Where can I get parafilm?
You were going to add a link.
Here is the link:
https://fruitmentor.com/grafting-supplies-and-tools